Crispy Rice and Mung Bean Crepes (Bánh Xèo)

Banh xeo with lettuce, herb and dipping sauce garnishes

One of my favourite meals is an Indian dosa. So I was ecstatic when I first tasted its equally delicious Vietnamese relative bánh xèo, pronounced “bang say-o”.

Bánh xèo is a savory Vietnamese crepe-style dish where portions of it are bundled around lettuce and herbs and dipped into a flavorful light dipping sauce.  Although the cooking technique for bánh xèo is much like a French crepe, it is in fact a cousin to the Indian dosa (my article in Zester Daily about Indian food influences in Vietnam), evidenced by a batter made from lentils and rice. To achieve a crispy exterior, you must pour the batter into a tablespoon of hot oil in a non-stick frying pan, seasoned cast iron pan or wok. You will know that you have added the batter at the right time when you hear the wonderful sizzling sound as it hits the oil and pan.

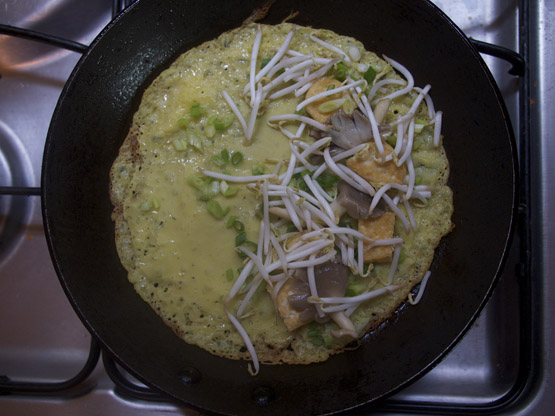
Place the filling ingredients over one half of the crepe to make it easier to fold over.

Banh xeo in a frying pan beginning to cook

Place the filling over just half of the crepe.

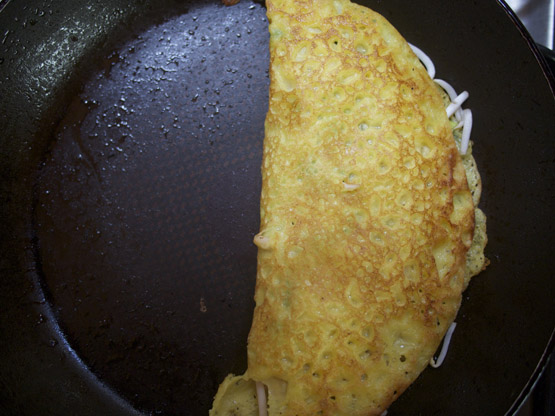
Banh xeo in frying pan having been just folded over in half

Fold the half of the crepe that has no filling on it over creating a half moon.

The batter can be made up to two days in advance and refrigerated but will need to be well stirred before using as the ground mung beans and rice flour settles when having sat for some time.

As you become more comfortable cooking the crepes, try using two pans at one time to increase your efficiency. They can be served straight from the pan or you can keep the cooked ones warm in a preheated oven while you prepare the rest of the crepes.

Crispy Rice and Mung Bean Crepes (Bánh Xèo)
Serves: Makes 10: Serves 4-6 as main dish
 
Ingredients
  • ½ cup mung beans
  • 1½ cups water
  • 1 cup rice flour
  • ¼ teaspoon turmeric powder
  • ½ teaspoon salt
  • ¼ cup coconut milk
  • ¾ pound firm tofu, cut 1 by 1 ½ inch rectangles and a ½ inch thick
  • 1 cup thinly sliced straw or button mushrooms
  • 2½ cups bean sprouts
  • 10 tablespoons vegetable oil
  • ½ cup thinly sliced spring onions
  • 2 heads of Bibb or Boston lettuce washed, dried, leaves separated and torn into palm sized pieces
  • 2 cups mixed herbs (coriander, Thai basil, mint, Vietnamese balm, radish or mustard sprouts)
Instructions
The Batter
  1. Place the mung beans in a bowl, cover with 1 inch of lukewarm water and soak for at least one hour, preferably two hours to overnight.
  2. Drain the mung beans and place them in a blender with 1½ cups of water. Blend for one minute. Add the rice flour, turmeric, salt, coconut milk and blend for another minute. Pour the batter through a fine mesh strainer into a bowl to remove any lumps. Put the batter in the fridge for at least 30 minutes or overnight.
  3. To make the filling, heat a tablespoon of oil in an 8 or 9 inch non-sticky frying pan or seasoned cast iron pan over medium heat. Add the tofu slices and cook for 2 or 3 minutes until lightly golden. Turn over and cook for another 2 minutes. Remove to a waiting plate.
  4. Heat a teaspoon of oil in the pan and lightly sauté the mushrooms for a minute or two. Remove and set aside on the same plate as the tofu.
  5. To cook the crepes, heat 1 tablespoon of oil in the pan over medium high heat. Pour a ¼ cup of batter into the hot pan, swirling and tilting the pan to evenly distribute it over the bottom. Fry for 1 ½ to 2 minutes until it becomes crisp and golden brown. Sprinkle 1 tablespoon of spring onions, 3 pieces of tofu, 4 slices of straw mushrooms and a small handful of bean sprouts over half of the crepe. Cover, turn the heat to medium-low and continue to cook for another 2 minutes.
  6. Uncover the crepe and use the spatula to fold it in half. Gently press on it with the spatula and let it cook and crisp up for another 30 seconds. Remove with the spatula and place onto a waiting plate. Serve immediately or keep warm in a pre-warmed oven.
  7. Repeat with the remaining batter and ingredients until everyone is full or the ingredients are all used up (the latter being the case in our house).
  8. To serve, use scissors to cut each crepe into four or five segments. Place a piece of lettuce in one hand and add a piece of crepe on top. Top with a generous pinch of herbs, roll the lettuce leaf up and dip into the sauce.

 

Fenugreek Chickpea Fries with Tamarind Chutney

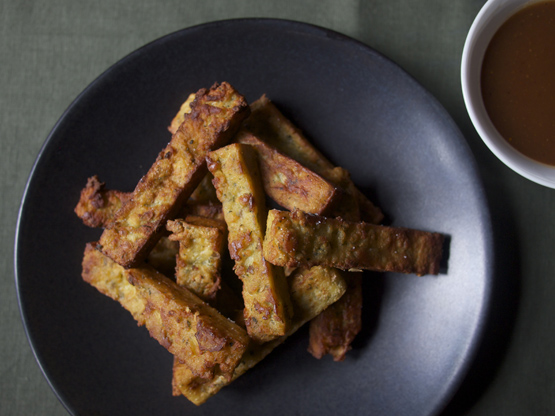
Spiced Fenugreek Chickpea fries with tamarind chutneyJust about the same time as I started chefs school my father led a bunch of visiting farmers on a trip to different farms throughout Saskatchewan and Alberta. He shared with me how they had visited a couple of chickpea (aka garbanzo bean) farms and was surprised to learn how versatile and delicious they were. He was served them as dips, in soups, salads, and side dishes. His experience shows that if you are unfamiliar with an ingredient, you get to the source, have people who know how to prepare it properly you can gain an appreciation for it and add it to the list of foods you eat.

A number of years later I had moved to Delhi and spent a couple of mornings wandering through the spice market and pulse vendors in Old Delhi. I was amazed to learn that a lot of the chickpeas, specifically the larger cream coloured kabuli and the smaller darker desi varieties, and lentils on display were grown in Canada and imported to South Asia. I was also told that the desi variety is often milled into flour, also known as besan in the Indian pantry.

I was familiar that chickpea flour was used in pakoras, rotis and chapattis but it wasn’t until I had my first tastes of Punjabi kadhi and the Gujarati snack khandvi that I fell back in love with it. I would also occasionally prepare savoury chickpea crepes or even try my hand at replicating an Italian inspired farinata that I tasted on the streets of Turin. A guy operating a wood-fired oven poured his chickpea batter into a greased round pan, topped it with roughly chopped rosemary and a light drizzle of olive oil. Using a long wooden pizza peel he slide the pan into the oven and cooked it for about 4-5 minutes. When it came out he sprinkled some coarse sea salt over it, cut it up into pizza like slices placing it on waxed butcher paper and passed it to me. It was simple cooking at it’s best. I’ve always felt mine fall short and blame it on not having a wood-fired oven.

Now living in Vietnam preparing recipes with chickpea flour, where is it not part of the cuisine, is not on my radar as much but I did recently see some in a specialty grocer. I purchased some, hummed and hawed over what to make before deciding upon making panisses, a French dish originating from Nice. However you may just want to call them chickpea fries based on their look and shape, and especially if you want to try to serve them to your kids.

I decided to give them an Indian accent by adding some fennel seeds, coriander seeds and dried fenugreek leaves (methi) and serving them with a tamarind chutney. If you want to stay with southern French flavours omit the spices, add a couple tablespoons of chopped Mediterranean herbs like thyme and/or rosemary and serve them with a garlicky aioli.

I’ve adapted Daniel Boulud’s recipe which uses milk as the cooking liquid giving the inside of the fries a creamier consistency but you can just use water or even vegetable stock if you like. Don’t skip the sifting of the chickpea flour as I once did which resulted in a lumpy mixture. The mixture needs to be cooled and refrigerated for a couple of hours before slicing so best to plan ahead.

Fenugreek Chickpea Fries with Tamarind Chutney
Serves: Makes about 45-50
 
Ingredients
  • 4 cups (1 litre) milk
  • 2 tablespoons olive oil
  • 1 tablespoon fennel seeds
  • 1 tablespoon crushed coriander seeds
  • ¾ teaspoon salt
  • 2 ¼ cups chickpea flour, sifted
  • 4 tablespoons, crushed dried fenugreek leaves (not seeds!)
  • ¾ cup vegetable oil, for frying
  • Sea salt for sprinkling
  • Tamarind chutney for dipping
Instructions
  1. Lightly grease a 9 X 9 inch square baking pan. (I used a silicone baking mould).
  2. Put the milk, olive oil, seeds and salt in a medium sized saucepan and heat over medium high heat. When the milk begins to simmer reduce the heat to low and slowly add the chickpea/fenugreek mixture in 4 or 5 separate additions. (If you dump the chickpea flour in one or two additions it tends to remain lumpy and will not smooth out during cooking). Use a whisk to incorporate the chickpea mixture and to make it smooth.
  3. When the chickpea flour is all incorporated switch from using a whisk to a wooden spoon. Cook the mixture, regularly stirring for about 10 minutes, to thoroughly cook the flour. Make sure to scrap the bottom and sides of the pan.
  4. Pour the thickened mixture into the prepared pan trying to spread it out evenly. I have found the pressing the top with lightly oiled hands or with a sheet of parchment paper or plastic helps to smoothen the top. If the top is not smooth don’t worry about it as the fries will still look and taste great.
  5. Cover with the parchment paper or plastic directly on the mixture and place the pan in the fridge for 2-3 hours or overnight to chill.
  6. Remove the pan from the fridge and carefully turn out the chilled solid mixture onto a cutting board and cut into French fry like batons about 3 inches long by ½ inch wide or roughly the length and width of your index finger.
  7. Heat ¾ cup of vegetable oil in a 10-inch frying or sauté pan over medium high heat.
  8. Line a large plate with some paper towel.
  9. After about 45 seconds the oil should be hot enough to carefully add in one baton. If there is a slight sizzle the oil is ready; if there is no sizzle wait another 15 seconds or so. Fry the batons in batches. I find 10-12 can be fried comfortably at one time. After 2 minutes you should see some of the edges becoming golden brown. Use some tongs to turn each baton and cook for another 2 minutes or until they are evenly golden brown and crisp. Remove to the paper-lined plate and sprinkle with some salt.
  10. Serve immediately with some tamarind chutney.
Notes
You can prepare these a little bit in advance and then gently reheat them in a 300F/ 150C oven for 5-10 minutes.


A Dal for Fall: Squash Red Lentil Coconut Dal

Squash and Red Lentil DalThe subdued shades of green, so dominant throughout the summer months, in our gardens and at farmer’s markets, are quickly being replaced with fantastic bursts of golden yellow and brilliant orange. Acorn, butternut, crooked neck, hubbard, and kabocha are some of the different squash varieties, which can easily be substituted for each other in your favourite squash recipes.  This creamy textured squash and red lentil dal will guarantee to provide warmth as the autumn chill arrives. Toss in a generous handful of chopped spinach or bitter greens near the end of cooking to add more vegetables to the dish. It is worth searching out fragrant fresh curry leaves, whose aroma will nicely blanket your kitchen, and whose flavour, I promise, you will quickly find addictive!  Serve with rice as a light meal or all on its own as a satisfying soup.

Squash Red Lentil Coconut Dal
Serves: 4
 
Ingredients
  • 2 ½ cups squash, peeled, seeded and cut into 1 inch cubes
  • ¾ cup split red lentils (masoor dal)
  • 1 tsp cumin powder
  • 1 tsp coriander powder
  • ½ tsp turmeric powder
  • ¼ tsp cayenne or chile powder
  • 4 cups of water
  • 1 cup of canned coconut milk
  • 1 to 1 ½ tsp salt
  • Tempering
  • 2 shallots or 1 small onion, finely sliced
  • 3 garlic cloves, finely chopped
  • ½ tsp mustard seeds
  • 1 branch (8-10 leaves) fresh curry leaves
  • 2 dried red chiles
  • 2 tbsp vegetable oil
  • 2 tbsp coriander, roughly chopped
Instructions
Put squash, red lentils, spice powders and water into a medium sized pot. Bring to a boil and skim off scum. Reduce heat to medium low, cover, and cook for 15 minutes. Add salt and check to see that both squash and lentils are cooked. If not, cook for another 5 minutes or until tender. Stir in one cup of canned coconut milk.

Prepare the tempering:
Heat vegetable oil over medium high heat in a small frying pan. Add mustard seeds. When they begin to pop add sliced shallots, curry leaves and dried red chiles. Cook for 5 minutes or until the shallots are light brown and translucent. Add the chopped garlic and cook for a minute. Spoon all of the tempering mixture into the dal. Adjust seasoning, if needed.

Garnish with chopped coriander and serve.

NOTE: This was originally posted on my blog on September 26, 2011

What’s The Deal with Kohlrabi?

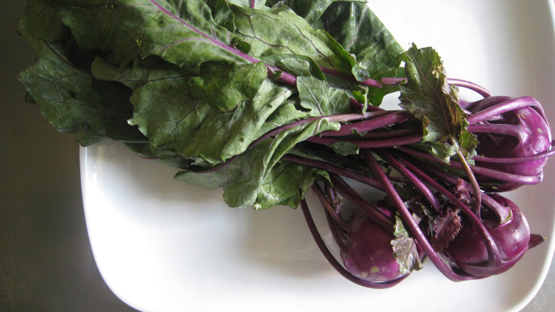
young kohlrabi and attached greensKohlrabi again was a featured vegetable in my CSA basket from Hilary Chop and Teamwork CSA. Holding it in my hands reminded me of my semester as a student in Vienna and my visits to the famous central Naschmarkt and seeing a knobby light green tennis ball sized vegetable for the first time.  It was described to me as a ‘cabbage turnip’.  At that point in time I tended to stay away from onomatopoeic foods- in this instance to ‘ turn up’ my nose to this vegetable. I did not think of kohlrabi until a couple of years later while thumbing through Madeleine Kamman’s ‘When French Women Cook’ and decided to make a light creamed kohlrabi dish with dill. Since then it made an annual visit into my Canadian kitchen each July.  I would julienne it for salads; make a smooth puree to accompany pork; or simply include it in a seasonal stir fry.

That was until I moved to Delhi where it would greet me in late October.  I would discuss different uses of kohlrabi (known as knol knol in Delhi or gaanth ghobi in the southern states) with the vendors from my favourite vegetable stall at INA market. The two recipes in this post make use of the entire plant. A comforting moong dal uses the leaves while the other, a spiced kohlrabi mash, highlights the main bulb.

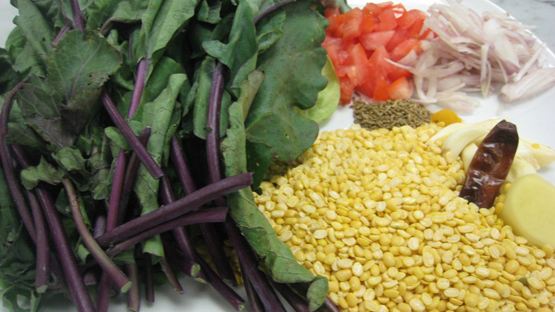
Ingredients for dal with kohlrabi greens

Ingredients for the yellow dal with kohlrabi greens

What's The Deal with Kohlrabi
Serves: 4
 
Ingredients
  • 3 cups greens (kohlrabi, spinach, swiss chard, or kale), roughly chopped
  • ½ cup moong dal
  • 3 cups water
  • 3 garlic cloves, finely chopped
  • 1 teaspoon fresh ginger, finely chopped
  • ⅛ teaspoon turmeric
  • Salt, to taste

  • For Tempering: Tadka
  • 1 tbsp oil
  • 1 plum tomato, seeded and diced
  • 1 dried red chile, halved
  • ½ teaspoon cumin seeds
  • 2 shallots, finely sliced
Instructions
Bring water to boil. Add kohlrabi greens and cook for 3 minutes or so until tender. Drain.

Put moong dal and 3 cups of water in medium sized pot and bring to a boil. Skim off any scum that rises to the surface. Add the garlic, ginger and turmeric. Partially cover and simmer gently over medium low heat for about 20 minutes. The dal should be soft. Add the blanched kohlrabi greens, fresh spinach and some salt and cook for another couple of minutes.

Meanwhile, prepare the tadka. In a small pan, heat the oil over medium high heat. Add the cumin seeds and once they give off their aroma (about 20-30 seconds) add the shallots and cook for another 3 minutes or until the lightly brown. Add the tomatoes, red chile and cook for another minute or so. Pour the tadka over the dal and mix well. Serve immediately.
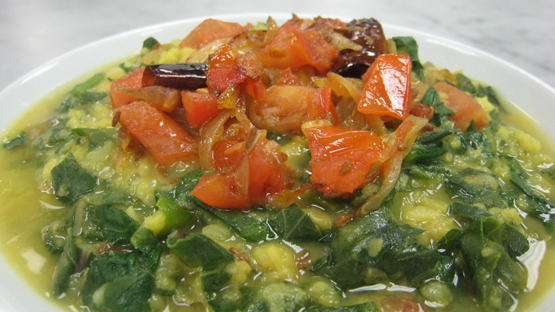
kohlrabi greens and yellow lentil dal

The finished dal: fresh, vibrant and alive with flavour

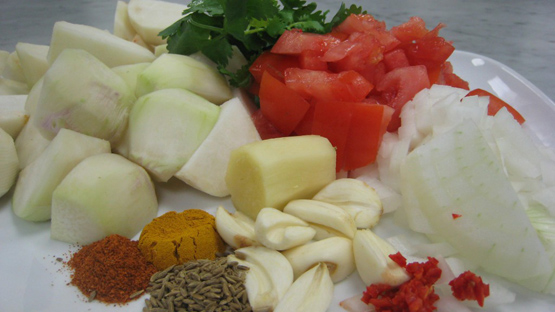
kohlrabi, tomatoes, onions, spices, garlic and ginger: ingredients for kohlrabi bharta

Ingredients for the kohlrabi bharta

Spiced Mashed Kohlrabi "Kohlrabi Bharta"
Serves: 4
 
This recipe is a riff on the well known eggplant dish baingan bharta. This time I have used kohlrabi as the main ingredient. If you do not have enough kohlrabi you can add some turnip.
Ingredients
  • 1 ½ pounds (6-8 medium sized) kohlrabi, peeled and quartered
  • 1 tablespoon vegetable oil
  • 3 garlic cloves, finely chopped
  • 1 tablespoon ginger, finely chopped
  • ½ teaspoon cumin seeds
  • 1 medium onion, finely chopped
  • 1 green finger chile, deseeded and finely chopped
  • ⅛ teaspoon cayenne powder
  • ½ teaspoon turmeric
  • 2 plum tomatoes, seed and pulp removed, diced
  • ½ teaspoon salt
  • 2 tablespoons coriander, roughly chopped
Instructions
Place quartered kohlrabi in a medium sized pot with 1 cup of water and salt. Bring to a boil. !Reduce heat and simmer for 15 minutes. The kohlrabi should be tender and easily pierced with a knife (like testing potatoes for mashed potatoes). Drain and set aside.

In the same pot or in a medium sized frying pan heat the oil over medium heat. Add the cumin seeds and fry for 30 seconds. Add the onion and sauté for 3-5 minutes or until lightly golden. Add the garlic, ginger, chile, spices and tomato. Cook for 1 minute. Add warm kohlrabi and roughly mash, ensuring that there are still nice big chunks. Cook for another couple of minutes until the ingredients are well mixed and the kohlrabi is hot. Adjust seasoning if need be. Garnish with fresh coriander and serve immediately.


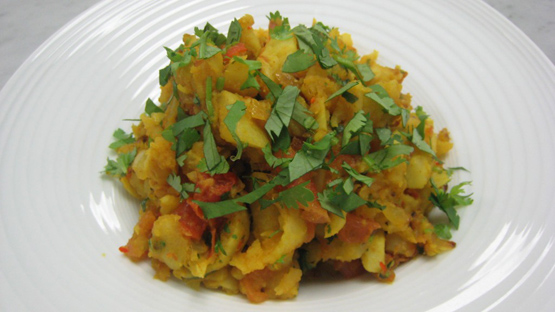
Kohlrabi bharta as a finished dish

The finished kohlrabi bharta

NOTE: This was originally posted to my blog India On My Plate on July 9, 2011