 Just about the same time as I started chefs school my father led a bunch of visiting farmers on a trip to different farms throughout Saskatchewan and Alberta. He shared with me how they had visited a couple of chickpea (aka garbanzo bean) farms and was surprised to learn how versatile and delicious they were. He was served them as dips, in soups, salads, and side dishes. His experience shows that if you are unfamiliar with an ingredient, you get to the source, have people who know how to prepare it properly you can gain an appreciation for it and add it to the list of foods you eat.
A number of years later I had moved to Delhi and spent a couple of mornings wandering through the spice market and pulse vendors in Old Delhi. I was amazed to learn that a lot of the chickpeas, specifically the larger cream coloured kabuli and the smaller darker desi varieties, and lentils on display were grown in Canada and imported to South Asia. I was also told that the desi variety is often milled into flour, also known as besan in the Indian pantry.
I was familiar that chickpea flour was used in pakoras, rotis and chapattis but it wasn’t until I had my first tastes of Punjabi kadhi and the Gujarati snack khandvi that I fell back in love with it. I would also occasionally prepare savoury chickpea crepes or even try my hand at replicating an Italian inspired farinata that I tasted on the streets of Turin. A guy operating a wood-fired oven poured his chickpea batter into a greased round pan, topped it with roughly chopped rosemary and a light drizzle of olive oil. Using a long wooden pizza peel he slide the pan into the oven and cooked it for about 4-5 minutes. When it came out he sprinkled some coarse sea salt over it, cut it up into pizza like slices placing it on waxed butcher paper and passed it to me. It was simple cooking at it’s best. I’ve always felt mine fall short and blame it on not having a wood-fired oven.
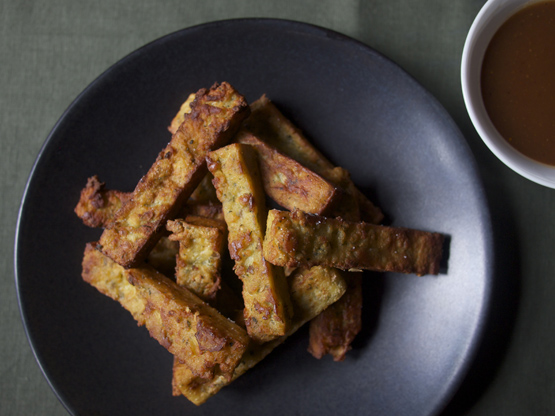
Now living in Vietnam preparing recipes with chickpea flour, where is it not part of the cuisine, is not on my radar as much but I did recently see some in a specialty grocer. I purchased some, hummed and hawed over what to make before deciding upon making panisses, a French dish originating from Nice. However you may just want to call them chickpea fries based on their look and shape, and especially if you want to try to serve them to your kids.
I decided to give them an Indian accent by adding some fennel seeds, coriander seeds and dried fenugreek leaves (methi) and serving them with a tamarind chutney. If you want to stay with southern French flavours omit the spices, add a couple tablespoons of chopped Mediterranean herbs like thyme and/or rosemary and serve them with a garlicky aioli.
I’ve adapted Daniel Boulud’s recipe which uses milk as the cooking liquid giving the inside of the fries a creamier consistency but you can just use water or even vegetable stock if you like. Don’t skip the sifting of the chickpea flour as I once did which resulted in a lumpy mixture. The mixture needs to be cooled and refrigerated for a couple of hours before slicing so best to plan ahead.
- 4 cups (1 litre) milk
- 2 tablespoons olive oil
- 1 tablespoon fennel seeds
- 1 tablespoon crushed coriander seeds
- ¾ teaspoon salt
- 2 ¼ cups chickpea flour, sifted
- 4 tablespoons, crushed dried fenugreek leaves (not seeds!)
- ¾ cup vegetable oil, for frying
- Sea salt for sprinkling
- Tamarind chutney for dipping
- Lightly grease a 9 X 9 inch square baking pan. (I used a silicone baking mould).
- Put the milk, olive oil, seeds and salt in a medium sized saucepan and heat over medium high heat. When the milk begins to simmer reduce the heat to low and slowly add the chickpea/fenugreek mixture in 4 or 5 separate additions. (If you dump the chickpea flour in one or two additions it tends to remain lumpy and will not smooth out during cooking). Use a whisk to incorporate the chickpea mixture and to make it smooth.
- When the chickpea flour is all incorporated switch from using a whisk to a wooden spoon. Cook the mixture, regularly stirring for about 10 minutes, to thoroughly cook the flour. Make sure to scrap the bottom and sides of the pan.
- Pour the thickened mixture into the prepared pan trying to spread it out evenly. I have found the pressing the top with lightly oiled hands or with a sheet of parchment paper or plastic helps to smoothen the top. If the top is not smooth don’t worry about it as the fries will still look and taste great.
- Cover with the parchment paper or plastic directly on the mixture and place the pan in the fridge for 2-3 hours or overnight to chill.
- Remove the pan from the fridge and carefully turn out the chilled solid mixture onto a cutting board and cut into French fry like batons about 3 inches long by ½ inch wide or roughly the length and width of your index finger.
- Heat ¾ cup of vegetable oil in a 10-inch frying or sauté pan over medium high heat.
- Line a large plate with some paper towel.
- After about 45 seconds the oil should be hot enough to carefully add in one baton. If there is a slight sizzle the oil is ready; if there is no sizzle wait another 15 seconds or so. Fry the batons in batches. I find 10-12 can be fried comfortably at one time. After 2 minutes you should see some of the edges becoming golden brown. Use some tongs to turn each baton and cook for another 2 minutes or until they are evenly golden brown and crisp. Remove to the paper-lined plate and sprinkle with some salt.
- Serve immediately with some tamarind chutney.
