Crispy Rice and Mung Bean Crepes (Bánh Xèo)

Banh xeo with lettuce, herb and dipping sauce garnishes

One of my favourite meals is an Indian dosa. So I was ecstatic when I first tasted its equally delicious Vietnamese relative bánh xèo, pronounced “bang say-o”.

Bánh xèo is a savory Vietnamese crepe-style dish where portions of it are bundled around lettuce and herbs and dipped into a flavorful light dipping sauce.  Although the cooking technique for bánh xèo is much like a French crepe, it is in fact a cousin to the Indian dosa (my article in Zester Daily about Indian food influences in Vietnam), evidenced by a batter made from lentils and rice. To achieve a crispy exterior, you must pour the batter into a tablespoon of hot oil in a non-stick frying pan, seasoned cast iron pan or wok. You will know that you have added the batter at the right time when you hear the wonderful sizzling sound as it hits the oil and pan.

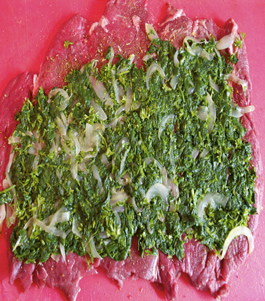
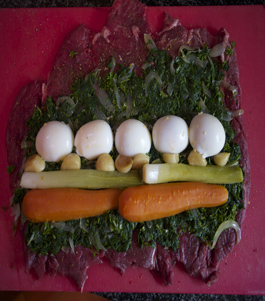
Place the filling ingredients over one half of the crepe to make it easier to fold over.

Banh xeo in a frying pan beginning to cook

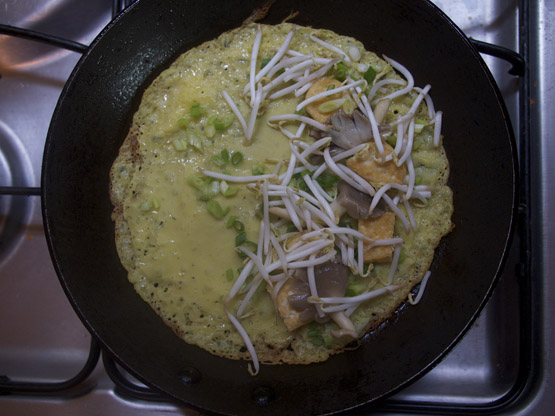
Place the filling over just half of the crepe.

Banh xeo in frying pan having been just folded over in half

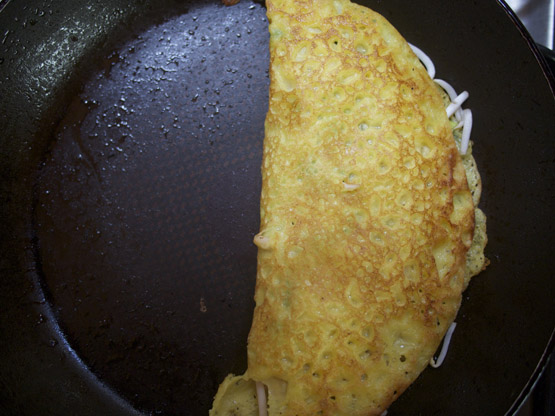
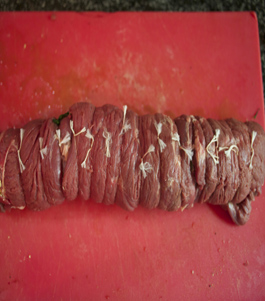
Fold the half of the crepe that has no filling on it over creating a half moon.

The batter can be made up to two days in advance and refrigerated but will need to be well stirred before using as the ground mung beans and rice flour settles when having sat for some time.

As you become more comfortable cooking the crepes, try using two pans at one time to increase your efficiency. They can be served straight from the pan or you can keep the cooked ones warm in a preheated oven while you prepare the rest of the crepes.

Crispy Rice and Mung Bean Crepes (Bánh Xèo)
Serves: Makes 10: Serves 4-6 as main dish
 
Ingredients
  • ½ cup mung beans
  • 1½ cups water
  • 1 cup rice flour
  • ¼ teaspoon turmeric powder
  • ½ teaspoon salt
  • ¼ cup coconut milk
  • ¾ pound firm tofu, cut 1 by 1 ½ inch rectangles and a ½ inch thick
  • 1 cup thinly sliced straw or button mushrooms
  • 2½ cups bean sprouts
  • 10 tablespoons vegetable oil
  • ½ cup thinly sliced spring onions
  • 2 heads of Bibb or Boston lettuce washed, dried, leaves separated and torn into palm sized pieces
  • 2 cups mixed herbs (coriander, Thai basil, mint, Vietnamese balm, radish or mustard sprouts)
Instructions
The Batter
  1. Place the mung beans in a bowl, cover with 1 inch of lukewarm water and soak for at least one hour, preferably two hours to overnight.
  2. Drain the mung beans and place them in a blender with 1½ cups of water. Blend for one minute. Add the rice flour, turmeric, salt, coconut milk and blend for another minute. Pour the batter through a fine mesh strainer into a bowl to remove any lumps. Put the batter in the fridge for at least 30 minutes or overnight.
  3. To make the filling, heat a tablespoon of oil in an 8 or 9 inch non-sticky frying pan or seasoned cast iron pan over medium heat. Add the tofu slices and cook for 2 or 3 minutes until lightly golden. Turn over and cook for another 2 minutes. Remove to a waiting plate.
  4. Heat a teaspoon of oil in the pan and lightly sauté the mushrooms for a minute or two. Remove and set aside on the same plate as the tofu.
  5. To cook the crepes, heat 1 tablespoon of oil in the pan over medium high heat. Pour a ¼ cup of batter into the hot pan, swirling and tilting the pan to evenly distribute it over the bottom. Fry for 1 ½ to 2 minutes until it becomes crisp and golden brown. Sprinkle 1 tablespoon of spring onions, 3 pieces of tofu, 4 slices of straw mushrooms and a small handful of bean sprouts over half of the crepe. Cover, turn the heat to medium-low and continue to cook for another 2 minutes.
  6. Uncover the crepe and use the spatula to fold it in half. Gently press on it with the spatula and let it cook and crisp up for another 30 seconds. Remove with the spatula and place onto a waiting plate. Serve immediately or keep warm in a pre-warmed oven.
  7. Repeat with the remaining batter and ingredients until everyone is full or the ingredients are all used up (the latter being the case in our house).
  8. To serve, use scissors to cut each crepe into four or five segments. Place a piece of lettuce in one hand and add a piece of crepe on top. Top with a generous pinch of herbs, roll the lettuce leaf up and dip into the sauce.


Guava Banana Coconut Bread

guava banana coconut bread and fresh guavas

It’s been a month and half since I was on the streets and in the markets in Hanoi. The fruit vendor’s bamboo baskets have changed but maintain a similar shade of green from the unripe mangoes in June to the granny smith green guavas of early August.

Yesterday was the last day of summer holidays and Ms. Ten Year Old wanted to bake something for her snack for the first day of Grade 5. The abundance of guavas sprang to mind and I thought about adapting our carrot bread recipe but could not find any large, apple-sized guavas and had to settle for the plum-sized ones instead. Since the smaller guavas could not easily be grated without including some of the populous seeds I turned to a banana coconut bread recipe in Naomi Duguid’s Homebaking that requires 3 cups of pureed bananas for inspiration.

The variety of guavas I used are unripe/semi ripe and are to be eaten that way, like an apple. So I needed to first make a puree before continuing with the remainder of the recipe. I’m also a sucker for a crunchy crumb topping on my quick breads or muffins and had some leftover in the freezer from a large batch baking session back before I left. That topping had oats instead of the coconut I have suggested in the recipe below.

Guava Banana Coconut Bread
Serves: makes 2 loaves
 
Ingredients
  • 2 pounds (1 kg.) green unripe/ semi-ripe guavas
  • 2 ½ cups all-purpose flour
  • 1 ½ cups whole-wheat flour
  • 2 teaspoons baking powder
  • 2 teaspoons baking soda
  • 1 teaspoon ground cinnamon
  • 2 or 3 ripe bananas (depending on size), mashed to make 1 cup of puree
  • ½ pound (225 grams) unsalted butter, room temperature
  • 1 ½ cups of sugar
  • 2 eggs
  • 2 teaspoons vanilla extract
  • 1 cup unsweetened grated coconut

Crumb Topping:
  • ⅓ cup brown sugar
  • ¼ cup all-purpose flour
  • ¼ cup unsweetened grated coconut
  • 4 tablespoons unsalted butter, chilled
Instructions
  1. Preheat the oven to 350F/180C. Grease and flour two 9 X 5 inch loaf pans.
  2. Peel and roughly chop the guava. Place in a medium sized pot with 1 cup of water. Bring to a boil, cover, lower the heat to medium low and cook for about 15 minutes. Check to see that all of the water has not evaporated (if it has add another ⅓ cup) and give a good stir to make sure that some of the guava has not stuck to the bottom of the pot. Recover and cook for another 15 to 20 minutes. The guava should now be soft. Transfer the guava to a blender and blend for about a minute until you have a puree.
  3. Set a fine mesh strainer over a bowl. Working in stages pour a third of the mixture into the strainer and use a spatula to press the puree through the strainer leaving the seeds behind. Repeat with the rest of the puree. Measure out 2 cups of puree into a medium sized bowl - this should be all of it; if you have more keep to make a nice smoothie; if you have a little less top up with some banana puree. Mix in 1 cup of banana puree and set aside
  4. As the guava is cooking prepare the crumb topping. In a small bowl use a fork to combine the sugar, flour and coconut. Add the butter in chunks and mix with back of fork or fingertips until coarse crumbs are formed. Set aside.
  5. In a medium bowl combine the flour, baking powder, baking soda and cinnamon.
  6. Using a mixer, beat the butter and sugar until light and fluffy. Add and mix in the eggs and vanilla extract. Beginning with the fruit puree, alternating with the flour mixture, stir in about one cup mixing until evenly combined. Once the puree and flour mixture have both been combined the batter should be smooth and evenly combined. Stir in the coconut.
  7. Spoon the batter into the greased loaf pans. Sprinkle each loaf with half of the topping.
  8. Place the pans on a baking sheet on a rack in the centre of the oven and bake for about 45 minutes or until the tops are golden and a cake tester/ toothpick inserted into the centre comes out clean. Transfer the loaves to a cooling rack removing from the pans about 30 minutes later. Allow to cool completely before wrapping tightly in plastic wrap.


Green Mango Mint Cooler: aka ‘Aam Panna’

A glass of green mango mint cooler, aam panna.During the summer months when the mango, ripe or otherwise, is king Indians transform the fruit numerous ways. One of the most refreshing results is a cooling aam panna, literally mango water, a lightly spiced celadon green concoction. Some homemade recipes add spices such as roasted cumin or black salt. I have decided to omit the spices as I didn’t expect my kids to like them and simply added some fresh mint. For a late afternoon adult version a shot of dark rum brings a welcomed zing.

The hard unripe mangoes need to be cooked, either boiled or roasted. Roasting is preferred as the flavour is more intense and they become a bit sweeter, evidenced by the slight caramel residue left on the baking sheet by the natural juices.

You may feel that cooking 1kg of green mango may be too much but it is worthwhile as it will save time when you want to make a quick drink. Once the fruit is cooked, puree the flesh on its own and put half of it in a container in the freezer for future use. Then simply follow the half recipe at the end.

Green Mango Mint Cooler: aka ‘Aam Panna’
Serves: Makes 6 cups
 
Ingredients
  • 1 kg green mangoes (about 3 mangoes)
  • ½ cup mint leaves (1 or 2 bunches depending on size)
  • 6 tablespoons sugar
  • 1 litre cold water
  • 1 cup ice
Instructions
  1. Preheat the oven to 350F/ 180C.
  2. Place the green mangoes on a baking sheet and into the oven.
  3. Roast the mangoes for 15 minutes and then turn them over and cook for another 15 to 20 minutes or until a dull green colour and fully soft when touched. Remove from the oven and cool to the touch.
  4. Alternatively, place the green mangoes in a pot and cover with water. Bring to a boil and simmer for 15-20 minutes or until the mangoes are fully soft when touched. Using a large spoon or tongs remove from water to a plate and let cool.
  5. Cut the mangoes in half and use a spoon to scoop out all of the flesh off the skin and the pit.
  6. Place the flesh in a blender along with the rest of the other ingredients. Blend for 1 to 2 minutes depending on how well your machine blends.
  7. Use a spoon to check to see if the mix is fibrous or not. If it is still somewhat fibrous pass it through a fine mesh strainer that has been placed over a larger bowl.
  8. Pour into a pitcher and chill in the fridge. Keeps for several days refrigerated.
Notes
Half Recipe
1 ¼ cup cooked, pureed green mango pulp
¼ cup mint leaves
3 tablespoons water
2 cups cold water
½ cup ice


Hanoi Social Supper Club Does the Tango

Last autumn I had a diner who was interested in attending one of the supper clubs but sadly by the time she enquired about availability the dinner was fully booked. Not wanting to disappoint friends and guests I then decided that the first person to be on the waitlist was guaranteed two places at the next supper club. In talking with this person, now my new friend Natalia, I learned that she was from Argentina and I suggested that we should do an Argentinian themed night. After a few months of finding a mutually available date we organized the latest installment of the Hanoi Social Supper Club featuring the cuisine of Argentina.

Hanoi Social Supper Club Argentina Dinner Invitation

Natalia and I met to discuss the menu with me already having some ideas in mind based on some research online and my regular visits to the wet market to see what is in season. Having never been to Argentina I felt it was important to have Natalia’s culinary and cultural input. We decided upon a menu theme of an informal family Sunday lunch or visit to a bodegon or neighbourhood bistro. A few years back reading the 2009 Saveur 100 issue the image of the dish matambre, or ‘hunger killer’, a browned, then braised flank steak rolled around cooked carrots, spinach and hard boiled eggs caught my eye and has remained on my never ending list of dishes I would like to make. Last year I was reminded of this dish, while enjoying another Saveur article by fellow Canadian David Sax, about his lunch experiences in Buenos Aires. Natalia was happy with my initial ideas and shared some necessary suggestions to ensure the right Argentinian flavours. Our menu for the evening was:

Chicken, Potato, Olive Empanadas

Roasted Mushrooms stuffed with Chorizo and Smoked Cheese

Chimichurri Sauce

Matambre

Russian Salad

Roast Beetroot, Arugula, Goat Cheese Salad with Balsamic Vinaigrette


Caramel Flan with Dulce De Leche

Fresh Tropical Fruits

As the appetizers were handed out Natalia shared with the supper club how Argentinian food was heavily influenced from Italian and Spanish immigrants yet adapted with the products available in Argentina. As we were ensconced on the second floor of a café in the middle of Hanoi we needed something to transport us to gorgeous landscapes of Argentina. So we projected the film Caballos Salvajes on the wall during the meal.

The folks at The Perennial Plate, Mirra and Daniel, produce fantastic short videos about the culture of food based on their interactions with chefs, farmers, such as these Argentinian cattle ranchers, and producers around the world. Just as I was searching for stories or videos to share with my guests they released a couple of videos about food in Argentina. Keep watch on their site as I believe they are editing a few more.

Natalia and her latina friends were extremely happy with how the meal looked and tasted joking that I must have had an Argentinian grandmother providing me guidance in the kitchen.

A Few Notes On Making Matambre

Rolled, cooked and sliced matambreIf you’re interested in trying the matambre recipe the Saveur recipe link above is worth using as a template, as I did. Below are some additional tips based on my experience.

Since it is hard to get a nice cut of flank steak here in Vietnam I ended up purchasing a whole rump/ top butt and then butchering it in to smaller sized roasts. I then gradually cut it on an angle, rolling it out to be relatively flat. Pounding the meat, no matter, what cut is a must to get it thinner.

cooked spinach and onions layered over pounded meat for Argentinian matambreIngredients for matambre, rolled Argentinian beef dish

Braise the Vegetables to Enhance Their Flavour

Instead of simply boiling the vegetables, I decided to braise them slowly in some butter and water. First the whole carrots until tender enough to cut with a spoon. I followed this with some leeks, as the ones at the markets here are about the thickness of a thumb – so a perfect addition to the dish. If you want to do this with larger leeks, first braise the entire leek first, you probably will have to cut the length of the leek down. Once cooked tender cut the leek in half lengthwise to make it more manageable for the dish. I also decided to braise some peeled garlic cloves (say one or two whole bulbs worth for the Saveur recipe).  All of the recipes I consulted indicated to add the spinach raw. Instead, I briefly boiled the spinach, refreshed it and then squeezed out all of the water and roughly chopped it. I thinly sliced an onion and then sautéed it for about 5 minutes before mixing it with the spinach.

Rolled and tied matambreBrowned matambre in braising pan

Tie It Tight

As the recipe says, it is important to tie the kitchen twine at 1-inch intervals to keep the roll together during the searing and cooking.

Great Picnic Fare

Lastly, instead of serving this hot or warm, I let it cool down and served it at room temperature, primarily since the days and nights are getting hot and humid in Hanoi and I thought it would be a nice change to start eating this way.

If you try making the matambre let me know how it turned out or feel free to ask any questions before attempting the recipe.


Green Mango Mulberry Crisp

Green Mangoes and bicycle in Hanoi

At this time of year in Hanoi, green mangoes are everywhere. Not that I want to escape them but it seems that I can’t go two hundred feet without coming across a woman from the country side standing beside her bicycle with a bamboo basket full of green mangoes. Each green mango laden bicycle I pass prompts me to mull over potential recipes and flavor combinations. Should it be a spicy, Thai inspired salad, always a favourite or a small batch of sweet sour Indian green mango chutney equally good for an Indian meal or as an accompaniment for some good cheese or grilled meat?

Last week my wife had informed me that we were off to our friend’s house for dinner and that we needed to take dessert. That day was already quite packed and so I needed something quick and easy to make. Coming back from the market on my trusty red Vespa I spotted a basket of the elusive burgundy, scarlet and claret berries for which I had been keeping my eye out. The beginning of green mango season coincides with the very short mulberry season and so upon spotting the more difficult to find berries I immediately knew what I was going to make.

Mulberries in springtime

I bought a few handfuls of the mulberries and 3 green mangoes from another vendor just a few yards away and I was set. Keeping in mind that the dish would need to be child friendly, I decided to add a couple of apples to the mix. I had tricked my kids earlier in the week by serving them a green mango mint cooler, aam pudina panna, by leaving out the ‘green’ in the name but I wasn’t sure that they were going to want to eat this dessert if there wasn’t something in the title that they were familiar. Plus, I wanted something slightly sweet to counter the tartness from the green mangoes and the mulberries. The apples would also add some needed pectin to the dish. To the crust I added some freshly grated coconut to bring a tropical nuttiness to the dish.

In the end the older kids, ages 8, 10 and early 40s devoured the dessert but the two 5 year olds weren’t so interested. Don’t make the mistake I did which was forgetting some vanilla ice cream to disguise fact that there were some fruits the younger kids weren’t fully comfortable with. If you are living outside of Asia for the next few months you should be able to find some green mangoes at your local Asian shops. As different berries, or even rhubarb, come in season you can easily substitute them for the mulberries.

Green Mango Mulberry Crisp
Serves: 8
 
Ingredients
  • 2 cups mulberries
  • 2 pounds (1 kg.) or 3 whole green mangoes
  • 2 sweet apples
  • ½ cup sugar
  • 2 tablespoons instant or pearl tapioca (or substitute same amount of tapioca flour or regular flour)
Crisp Topping
  • ⅓ cup oats
  • ½ cup grated coconut, unsweetened
  • 1 cup flour
  • ½ cup sugar
  • ½ cup brown sugar
  • ¾ teaspoon ground cinnamon
  • ½ cup cold unsalted butter
Instructions
  1. Preheat the oven to 375F/ 190C.
  2. Cut off any small twigs, if any, from the mulberries. Fill a large bowl with water, add the berries and swish them around gently with your hands to loosen any dirt. Wait a minute for the dirt particles to sink to the bottom and using a slotted spoon, spider or your hands remove the mulberries to a waiting dish. Drain the water, rinsing away any settled dirt and wash the mulberries one more time. Drain well and set the mulberries in a large bowl.
  3. Peel the green mangoes and cut around the large flat pit to get two halves plus a few other smaller pieces. Cut the halves and other pieces into 1 ½ inch cubes. Place over the mulberries in the large bowl.
  4. Peel and core the apples and cut the apples into 1 inch cubes. (Note: the mango chunks should be larger than the apples so that the more tender mango pieces do not overcook by the time the apple pieces are soft and tender) Add to bowl of cut fruit.
  5. Sprinkle the sugar and tapioca pearls, or flour if using, over the fruit and gently toss to mix well. Transfer the mixture to an 8 by 11 inch baking dish (or one that holds the 8 cups of cut fruit).
  6. In a medium bowl, toss the oats with the coconut, flour, white and brown sugars, and cinnamon. Grate the butter, using the large holes of a grater, over the flour mixture. Alternatively you can cut the butter into ½ inch cubes and toss into the flour mixture. Using your fingertips, mix the butter until the topping has pea-sized crumbs. Sprinkle the topping evenly over the fruit.
  7. Place the filled baking dish onto a tray and into the middle level of the preheated oven. Bake for about 35 to 45 minutes or until the top is golden brown and the fruit is starting to bubble around the edges of the dish.
  8. Let the crisp cool for 30 minutes before serving. Serve with ice cream (vanilla or ginger) or whipped cream.